
Home Improvement
4 Interesting House Entry Decor Ideas

Artificial turf can be used in a variety of ways to create stunning home entry decor Ideas. From wreaths to putting greens, there are lots of ways to incorporate this popular decor trend into your home’s exterior.
Artificial grass can also be used in a variety of ways to add a touch of green to your interior decor Ideas. These 4 interesting house entry decor ideas will spruce up your entrance and make your guests feel welcome as they enter!
1. Artificial Turf
Using artificial turf to decorate your house entry is an interesting idea that will make a bold statement without looking too out of place. It is also low maintenance and will not require any weeding or fertilizing.
This type of turf is perfect for the front door of a house as it will give you and your guests a warm welcome when you come through. It is also durable and will stand up to any weather conditions that may come its way.
There are many options for installing this type of grass and you can even get different designs to fit your home decor Ideas. One of the most popular options is to use it as a floor mat.
You can cut it into various shapes and then glue it onto your walls for an interesting look.
Also create a mini putting green in your office space. This is an excellent idea for those who do not have a lot of space in their office and would like to have something that they can use as a relaxing retreat.
The turf used for this putting green is easy to maintain and looks very realistic. Besides, it is also very affordable.
In this Homestead, London, courtyard, this is a great example of how artificial turf can be a great addition to a small backyard. This is because it is very easy to install and requires little upkeep.
A balcony or porch could benefit from this kind of turf as well, especially if you want to break up an expanse of hardscape. The soft grass will not only provide a cool surface to walk on but it will also be easy to clean as well.
2. A Wreath Made of Turf
A Wreaths are a classic way of adding greenery and festivity to your front door. Whether you choose to use an artificial wreath or make your own from natural materials, it’s an easy, cost-effective, and unique decor solution for any house.
If you’re looking for a simple, yet effective wreath to display this summer, consider a pampas grass wreath that can be made with minimal effort and no cost! Alternatively, you can also make a wreath with a wire wreath ring and some yarn to give it a more natural look.
To start off, gather a bunch of wild greenery and arrange it around the wreath ring to form the base. Try a mix of different types and textures, from long twigs to grasses and ferns. The more interesting and varied your collection is, the more distinctive your wreath will be.
You can then add other wild twigs, leaves and stems to your wreath as you go along. Ivy, holly, pine box, privet and rosemary all work well, and so do some interesting, frothier stems. For extra detail, you can bind together little bundles of other softer materials with florist’s wire and attach to the wreath.
Now you can hang the wreath on the door or put it in a hoop for displaying it on the wall. You can even mount it on a window pane for a fun fall wreath that will allow you to enjoy it from both inside and out!
As with any other type of decor Ideas, it’s important to keep your grass wreath clean and well watered to ensure it stays fresh. A spritz of water every week will help keep your wreath looking its best and make it last all winter!
3. A Border Around Your Door
One of the most interesting uses for artificial turf is a faux grassy border along your front door. Not only does it look slick but it’s an effective way to deflect the elements and keep your front yard looking as good as your lawn. A well designed and installed faux grassy border can be an affordable and easy home improvement to add to your to do list. Using the right type of synthetic turf can also ward off unwanted pests such as ants and mice. To get the most out of your nifty new addition, be sure to choose the best type of faux grassy border for your specific needs and budget. Getting the job done right can make your home more inviting and more fun for you and your guests!
4. A Mini Putting Green
If you’re looking for a new way to spice up your home entry, consider putting a mini putting green in place. These artificial turf installations are a great addition to any home or office, and come with some awesome benefits as well.
It’s Easy to Install
One of the best things about putting greens is that they’re simple to set up. They’re usually made of synthetic grass, which means they’re durable and require very little maintenance. However, there are a few things to keep in mind when installing a putting green.
Whether you’re buying an outdoor putting green or an indoor one, the pile height is important. A high pile height can be difficult to hit a ball with, while a low one ensures that your putts roll true.
There are a few different types of putting greens available, so it’s important to know what you want before you buy. You can either choose a mat or a turf roll, and each type has its own unique benefits and limitations.
A mat is great for those who have limited space, and it allows you to practice your putting anywhere in the house or yard. It’s also easier to transport than a turf roll, and it offers a variety of hole sizes to provide replay options.
Turf rolls are more traditional putting greens, but they’re easy to install and offer a larger playing area than mats. They’re also more durable than mats, so you can rest assured that your turf will last for years to come.
They’re a great option for those who are looking to get a more premium experience, since they’re made from a more realistic synthetic grass. They also look very much like a real golf green, so your friends and family will love to come over to play on them!
If you’re not sure where to start when it comes to choosing a putting green, we’ve put together some tips to help you find the perfect one. From skill level to price, these tips will help you make the right decision for you.
ALSO READ: https://techalphanews.com/

The Homelite UV80522 drain plug location is an essential detail for users who want to maintain their pressure washer properly. This small component plays a vital role in draining used oil and water from the engine and pump.
Many pressure washer users face issues when trying to find or remove the drain plug. Without proper drainage, the machine can suffer from reduced efficiency and even internal damage.
Understanding its exact location and how to access it can make oil changes and maintenance much easier. Regular drainage ensures that your pressure washer runs smoothly and lasts longer.
In this guide, you’ll learn the precise location of the drain plug, how to access it, common issues, and maintenance tips. These steps will help you avoid unnecessary repairs and keep your pressure washer in top condition.
Unique & Important Detail About Homelite UV80522 Drain Plug Location
The Homelite UV80522 drain plug location is strategically placed at the bottom of the pressure washer, near the pump and engine. This positioning allows for easy access when draining old oil or water, ensuring smooth maintenance. However, it may sometimes be slightly hidden due to dirt buildup or protective covers, requiring a quick inspection before removal.
One key detail to remember is that tilting the pressure washer slightly can help in fully draining all fluids. This prevents leftover oil from mixing with fresh oil, which could impact engine performance. Ensuring the drain plug is securely tightened after drainage is equally important to prevent leaks and maintain optimal operation. Regularly checking this plug for wear and rust can extend the life of your pressure washer.
Understanding the Drain Plug in a Pressure Washer
A drain plug is a small but crucial component in pressure washers, including the Homelite UV80522. It allows users to remove old oil and water from the engine and pump. Regularly draining oil prevents sludge buildup and keeps the internal components clean.
Without a properly working drain plug, oil can become contaminated with dirt and debris. This can cause engine wear and overheating, leading to expensive repairs. Checking and cleaning the drain plug regularly is important.
The drain plug also prevents water from remaining inside the pump after use. Leftover water can cause corrosion and reduce the machine’s efficiency. If not drained, it might also freeze in cold weather, leading to cracks in the system.
By using the drain plug correctly, you can extend the lifespan of your pressure washer. Routine maintenance will ensure better performance and fuel efficiency, reducing the chances of breakdowns.
Exact Location of the Drain Plug on the Homelite UV80522
The Homelite UV80522 drain plug location is found at the bottom of the pressure washer. It is usually placed near the pump and engine area, where oil and water accumulate. This placement makes it easy to drain fluids efficiently.
To find the plug, you may need to tilt the unit slightly forward. This will expose the small bolt or cap that covers the drain plug. If the unit is on uneven ground, place it on a flat surface for easier access.
Some models have protective covers or panels that hide the drain plug. If you don’t see it right away, check the user manual or inspect the underside of the pressure washer carefully. Removing any dirt buildup can also help make it visible.
For an easy reference, here’s a quick breakdown of its typical location:
| Component | Location in Homelite UV80522 |
| Drain Plug | Bottom of the unit, near the pump |
| Oil Drainage Point | Beneath the engine block |
| Water Drainage | Lower section, near hose connection |
Finding and accessing the drain plug properly ensures a smooth oil change without spillage.
How to Access and Use the Drain Plug
Before using the drain plug, always turn off the pressure washer and let the engine cool down. Hot oil can cause burns, so waiting a few minutes ensures safety. Also, make sure the unit is on a stable surface.
To access the drain plug, locate it near the pump area and use a wrench to loosen it. If it feels tight, apply light force but avoid stripping the bolt. Once loosened, gently remove it and let the oil or water drain completely.
During the draining process, allow all the fluid to exit before replacing the plug. Some users tilt the machine slightly to help the last drops escape. This prevents old oil from mixing with fresh oil during the next refill.
After draining, wipe the area clean and securely tighten the plug. Make sure the engine is leak-free before starting it. A poorly sealed plug can cause oil to drip and lead to operational issues.
Common Issues and Troubleshooting
One common issue with the Homelite UV80522 drain plug location is that it may become stuck due to dirt, rust, or over-tightening. Applying a bit of penetrating oil can help loosen it without damaging the bolt.
Another problem users face is oil leaks after reattaching the drain plug. This often happens when the washer or gasket is worn out. Replacing the seal ensures a proper fit and prevents leakage.
If the drain plug is missing, you should replace it with the correct size to avoid improper drainage. Using an ill-fitting plug can lead to oil loss, affecting engine performance.
Users should also be aware of incorrect drainage methods. Draining oil while the washer is running or placing it on an uneven surface can cause spills. Always follow the correct steps to avoid mess and potential engine damage.
Proper troubleshooting can prevent costly repairs and keep the pressure washer running efficiently.
Maintenance Tips for Longevity
Regular maintenance of the Homelite UV80522 drain plug location ensures the machine operates efficiently. Checking the plug for dirt and corrosion every few weeks is a simple way to prevent future issues.
Always use the recommended oil type and replace it at the suggested intervals. Old or dirty oil can cause sludge buildup, leading to poor engine performance and overheating.
Store the pressure washer in a dry, clean place when not in use. Moisture buildup can lead to rust, making it harder to remove the drain plug when needed. Covering the unit can also help keep it in good condition.
If you notice any leaks around the drain plug, replace the washer or gasket immediately. Ignoring small leaks can lead to bigger mechanical failures over time.
By following these maintenance steps, you can extend the lifespan of your Homelite UV80522 pressure washer and ensure smooth operation for years to come.
Conclusion
The Homelite UV80522 drain plug location is a crucial part of the machine that helps with oil and water drainage. Knowing its exact position makes maintenance easier and prevents common operational issues.
Regularly checking and cleaning the drain plug ensures proper functionality. It also reduces the chances of rust buildup, leakage, or difficulties in removing the plug.
Following the correct steps for draining and refilling oil helps maintain the pressure washer’s performance. Using the right tools and techniques will make the process quick and hassle-free.
By prioritizing maintenance and troubleshooting minor issues early, you can keep your Homelite pressure washer running efficiently for a long time.
FAQs
Where exactly is the Homelite UV80522 drain plug located?
The drain plug is at the bottom of the unit, near the pump and engine, typically covered by a small bolt or cap.
How do I remove the drain plug without damaging it?
Use a wrench to loosen it gently; if stuck, apply penetrating oil and avoid excessive force to prevent stripping the bolt.
What should I do if oil leaks after replacing the drain plug?
Check if the washer or gasket is worn out and replace it to ensure a proper seal, preventing further leaks.
Can I drain oil from the Homelite UV80522 while it’s running?
No, always turn off the engine and let it cool before draining to prevent burns and ensure safe maintenance.
How often should I check and clean the drain plug?
Inspect it every few weeks for dirt, rust, or leaks to maintain smooth operation and prevent long-term issues.
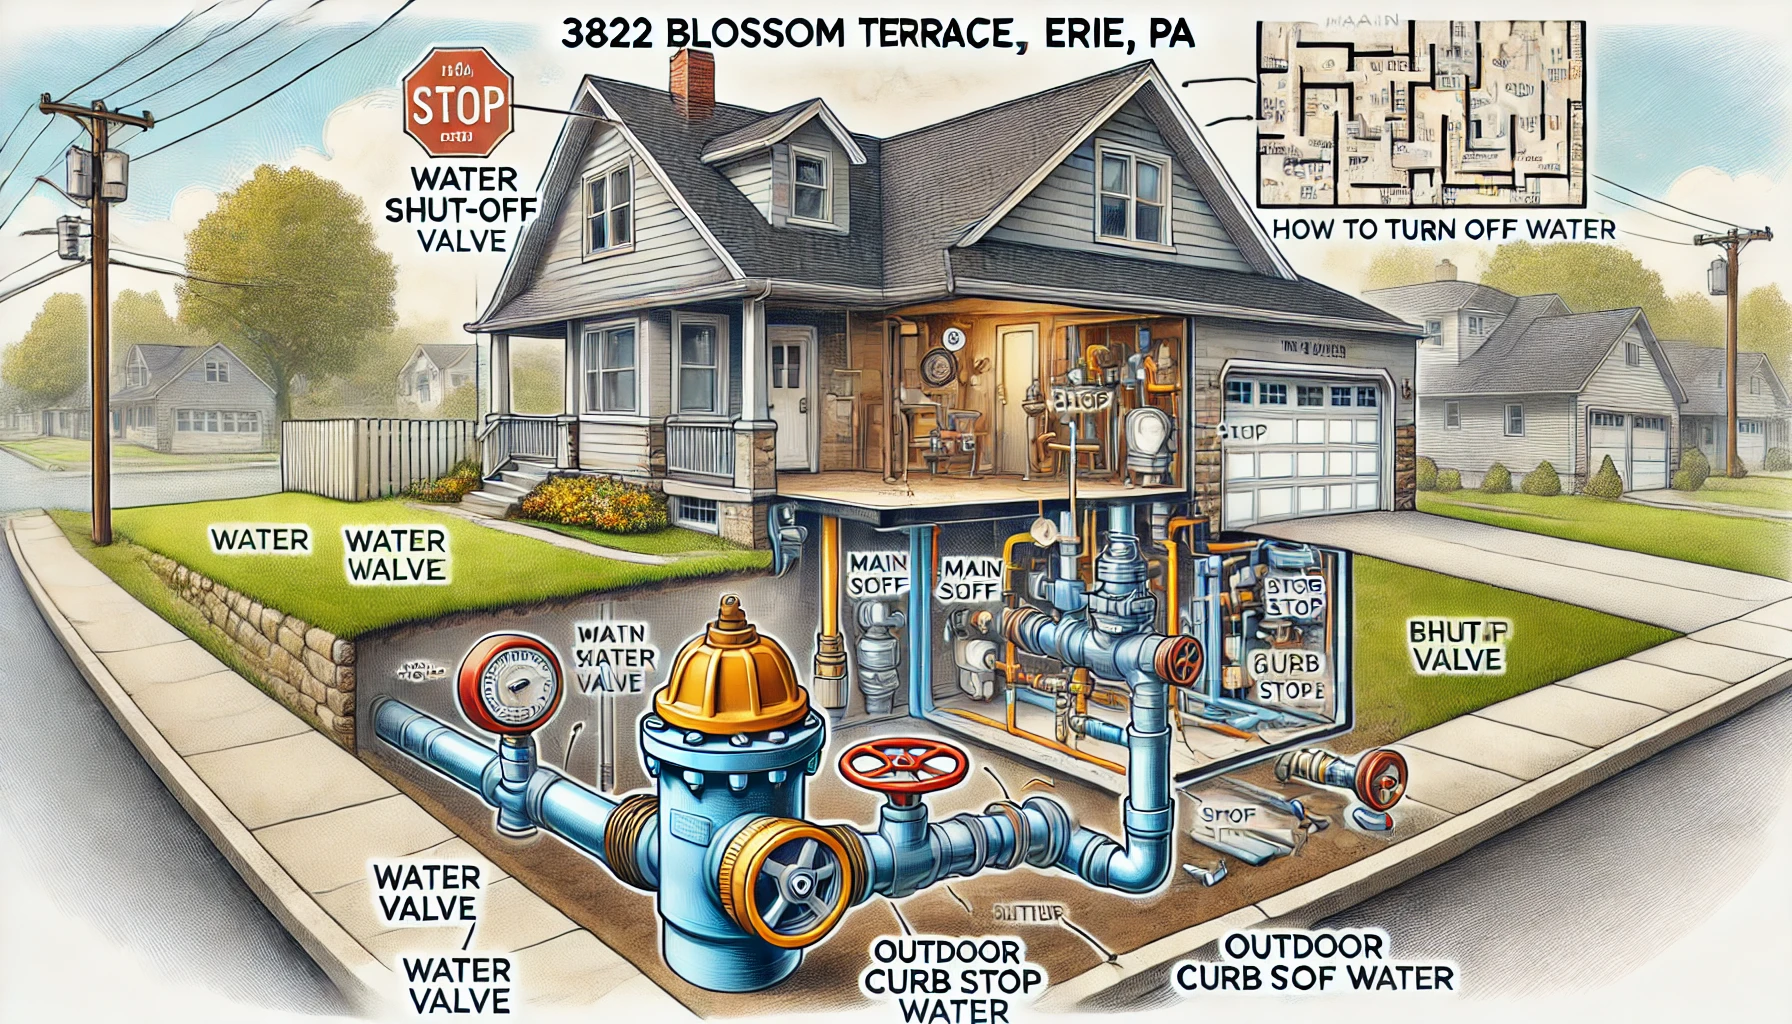
Turning off the water supply is an essential skill every homeowner or tenant should know. Whether for emergency situations like leaks and pipe bursts or routine maintenance, shutting off the water at the right time can prevent damage and unnecessary expenses.
For those residing at 3822 Blossom Terrace Erie PA how to turn off water, understanding the shut-off system is crucial. The property follows a standard residential layout, but knowing where to locate the main shut-off valve and how to operate it correctly can save time and effort.
This guide explains how to turn off the water at this address in an easy-to-follow manner. It covers various locations of shut-off valves, methods to turn them off, and additional safety tips.
If you ever face difficulties finding or operating the shut-off valve, Erie Water Works or a professional plumber can provide assistance.
Locating the Main Water Shut-Off Valve
The main water shut-off valve is typically placed near the point where the water supply enters the home. In most homes, this is either in the basement, a utility room, or outside near the foundation.
For properties like 3822 Blossom Terrace, Erie, PA, basements are common, and the valve is often found along an exterior wall. If the home has a crawlspace, check near the entry point of the main water line.
If the shut-off valve is not inside, it might be in an underground box near the curb, known as a curb stop valve. This requires a special tool or professional assistance to access.
Water meters are also connected to a shut-off valve. If you’re unable to find the main valve, checking near the meter is another effective option.
Types of Water Shut-Off Valves and How They Work
Gate valves and ball valves are the two primary varieties of water shut-off valves. Identifying which type you have will help in shutting off the water correctly.
- Gate Valve: A round wheel handle that requires multiple clockwise turns to close. These are common in older homes.
- Ball Valve: A lever-style handle that requires just a 90-degree turn to shut off. These are more common in newer homes.
Each of these valves operates differently, so knowing the correct method will prevent damage to the valve or plumbing system.
For fixture-specific shut-off valves, such as under sinks or behind toilets, you can turn off the small knobs individually without shutting off the entire house’s water supply.
Steps to Turn Off the Water at 3822 Blossom Terrace, Erie, PA
To turn off the water, follow these simple steps based on the valve type and location.
First, locate the main shut-off valve using the methods described above. If it is a gate valve, rotate the handle clockwise several times until it stops. For a ball valve, simply turn the lever so it is perpendicular to the pipe.
Second, verify that the water is off by turning on a faucet. If no water flows, the shut-off was successful. If water continues to flow, double-check that the valve is fully closed.
Third, if shutting off the water for winterization, open the lowest faucet in the home to drain excess water from the pipes and prevent freezing.
If the shut-off valve is stuck or hard to turn, apply a lubricant like WD-40 and use a wrench carefully. Avoid using excessive force, as this can break the valve.
Table: Common Water Shut-Off Locations and How to Access Them
| Location | Typical Placement | How to Shut Off |
| Basement | Near the front foundation wall | Turn gate valve clockwise or ball valve 90° |
| Utility Room | Near the water heater or furnace | Rotate the handle or lever fully |
| Under Sinks | Below the faucet, inside the cabinet | Turn small shut-off knobs clockwise |
| Toilet Supply | Near the base of the toilet | Turn clockwise to stop water flow |
| Outside Curb Box | Underground near the sidewalk | Requires special key or professional help |
If the home’s shut-off valve is not working or difficult to access, the curb stop valve may be the only option. However, this often requires a plumber or water company assistance.
Additional Precautions and Troubleshooting
For homeowners in Erie, PA, it’s important to take extra precautions during freezing temperatures. Water inside pipes can freeze and expand, leading to bursts. Turning off and draining pipes before winter can help prevent this.
Testing the shut-off valve at least once a year ensures it remains functional. A valve that is not used regularly may become stuck over time, making it difficult to operate in an emergency.
If a valve is rusted or leaking, replacing it with a modern ball valve is recommended. These are more durable and easier to use in emergencies.
In case of a major plumbing issue, contacting a professional plumber or Erie Water Works (814-870-8087) is the best course of action. They can provide assistance if the shut-off valve is malfunctioning or inaccessible.
Conclusion
Understanding how to shut off the water supply at 3822 Blossom Terrace Erie PA how to turn off water is crucial for preventing water damage and managing plumbing repairs efficiently.
Locating the shut-off valve early, knowing the different valve types, and following the correct shut-off procedures can save time and avoid costly repairs.
If a problem arises with the shut-off valve or it is inaccessible, using the curb stop valve or contacting Erie Water Works may be necessary.
By following the steps in this guide, homeowners can confidently turn off their water supply whenever needed, ensuring safety and efficiency.
FAQs
Where is the main water shut-off valve in 3822 Blossom Terrace, Erie, PA?
The main shut-off valve is usually in the basement, utility room, or outside near the foundation or water meter.
How do I turn off the water if I can’t find the main shut-off valve?
Check near the water meter or use the curb stop valve, which may require a special tool or professional help.
What should I do if the shut-off valve is stuck or won’t turn?
Apply WD-40 or use a wrench gently; if it still won’t turn, call a plumber to avoid breaking the valve.
Can I turn off water only to a specific fixture instead of the whole house?
Yes, use the small shut-off valves under sinks, behind toilets, or near appliances to stop water flow to specific areas.
What should I do after turning off the water to prevent damage?
Open a faucet to release pressure, and if shutting off for winter, drain pipes to prevent freezing.

What Is Shabby Chic Decor? A Complete Overview
Shabby chic decor is a design style that combines vintage elegance with a relaxed, lived-in feel. It embraces distressed furniture, soft pastel colors, and delicate fabrics, creating a cozy and nostalgic atmosphere. This style is known for its mix of antique charm and modern comfort, making it perfect for those who love a timeless yet effortless aesthetic.
One of the key features of shabby chic decor is its use of repurposed or aged furniture. Rather than focusing on perfectly polished pieces, this style highlights imperfections, such as chipped paint or weathered wood, to add character and authenticity.
- Soft, muted colors like white, cream, and pastel shades dominate the shabby chic palette.
- Vintage accessories such as lace curtains, floral prints, and distressed picture frames add charm.
- Comfortable textures like cotton, linen, and ruffled bedding enhance the cozy appeal.
Shabby chic decore is versatile and works in various spaces, from cozy cottages to contemporary homes. It allows for personalization through DIY projects and upcycled furniture, making it an eco-friendly and budget-friendly option.
The History and Evolution of Shabby Chic Decor
The shabby chic style originated in the 1980s, influenced by the rustic charm of English country homes. It was popularized by designer Rachel Ashwell, who introduced the world to the beauty of aged furniture, soft textiles, and romantic decor elements. Her approach emphasized comfort and elegance, making the style widely accessible.
Over time, shabby chic decoration has evolved to include modern touches while maintaining its vintage essence. Today, it blends well with other styles like farmhouse, bohemian, and even minimalist interiors, creating a perfect mix of old and new.
In recent years, sustainability has played a role in the resurgence of shabby chic decor. Many homeowners appreciate its focus on repurposing antique furniture and using eco-friendly materials, making it a responsible and stylish choice.
Essential Elements Of Shabby Chic Decor For Every Home
Shabby chic decore revolves around key design elements that create its signature look. These elements work together to bring warmth, elegance, and a touch of nostalgia to any space.
Furniture plays a crucial role in this style. Aged wood, distressed paint, and ornate detailing define shabby chic pieces. Whether it’s a weathered dining table or a vintage vanity, furniture should have a well-loved, timeless appeal.
- Textiles and Fabrics: Soft, flowing fabrics such as lace, linen, and cotton are essential. Ruffled bedding, floral curtains, and crocheted cushions add to the charm.
- Decor and Accessories: Delicate chandeliers, antique mirrors, and vintage photo frames enhance the overall aesthetic. Fresh or dried flowers in rustic vases also bring a natural touch.
Layering these elements thoughtfully can transform any room into a dreamy, shabby chic retreat without overwhelming the space.
How To Incorporate Shabby Chic Decor Into Modern Interiors
Blending shabby chic decor with modern design creates a balanced and inviting space. The key is to mix vintage elements with contemporary pieces for a fresh yet nostalgic feel.
Start by introducing shabby chic accents into a neutral, modern setting. A distressed wooden coffee table or a vintage-inspired armchair can instantly soften the sleekness of a modern living room. Pair these with contemporary sofas and minimalist decor to maintain a clean yet cozy look.
For a harmonious blend, focus on textures and materials. Combine smooth modern surfaces like glass or metal with soft shabby chic fabrics such as linen and velvet. This contrast adds depth and visual interest without making the space feel overly antique.
If you prefer a subtle approach, incorporate shabby chic elements through accessories like floral cushions, delicate table lamps, or an ornate mirror. These small touches help infuse the style without requiring a complete makeover.
Choosing The Perfect Color Palette For Shabby Chic Decor
The color palette of shabby chic decor is soft, romantic, and inspired by nature. Light shades dominate, creating a bright and airy ambiance that feels both cozy and elegant.
White is the foundation of shabby chic design, providing a clean and fresh base. It pairs beautifully with pastel hues like blush pink, soft blue, and mint green, which add a gentle pop of color. These shades work well on walls, furniture, and decor accents.
- Muted Neutrals: Beige, ivory, and light gray complement the shabby chic aesthetic without overpowering it.
- Floral and Vintage-Inspired Patterns: Soft floral prints in wallpaper, upholstery, or bedding bring warmth and personality.
To keep the look cohesive, avoid bold or overly saturated colors. Instead, focus on subtle contrasts and layering different shades to achieve a naturally aged and inviting appearance.
Diy Ideas To Create Stunning Shabby Chic Decor Pieces
Creating shabby chic decor pieces at home is a fun and budget-friendly way to personalize your space. With a little creativity, you can transform old furniture and simple accessories into charming, vintage-inspired treasures.
One of the easiest DIY projects is distressing furniture. By sanding down edges and using chalk paint in soft pastel shades, you can give an old wooden chair or table a beautiful, aged look. Adding floral stencils or decoupage designs enhances the vintage feel.
- Upcycled Mason Jars: Paint mason jars in muted colors and distress them for a rustic touch. They can be used as vases, candle holders, or storage containers.
- Lace-Wrapped Votives: Wrap glass votive holders with lace fabric and secure with twine for an elegant candlelight effect.
- Fabric-Covered Storage Boxes: Use floral fabric and mod podge to turn plain boxes into stylish storage solutions.
Handmade decor adds a personal touch and makes your shabby chic space feel even more cozy and inviting.
Best Furniture Styles To Achieve The Shabby Chic Decor Look
Shabby chic furniture is all about elegance, comfort, and a touch of rustic charm. The style embraces vintage-inspired pieces that look well-loved and timeless.
Distressed wood furniture is a staple in shabby chic decor. Dressers, cabinets, and dining tables with a weathered finish bring an antique appeal to any space. Soft, curved edges and ornate details make these pieces even more charming.
For seating, upholstered chairs and cozy sofas with neutral or floral fabric work beautifully. Tufted headboards, ruffled slipcovers, and cushioned benches add to the soft and inviting atmosphere of the room.
Another popular choice is repurposed furniture. Old trunks can become coffee tables, while vintage doors can be transformed into headboards. These unique touches make the space feel more personal and full of character.
Common Mistakes To Avoid When Designing With Shabby Chic Decor
While shabby chic decor is meant to be effortless and relaxed, certain design mistakes can make it look cluttered or overwhelming. Keeping a balance is key to achieving the perfect aesthetic.
One common mistake is overdoing the distressed look. While aged and weathered furniture is a signature element, too many distressed pieces can make a room feel unpolished. It’s best to mix aged furniture with smoother, well-maintained pieces for contrast.
- Too Much Clutter: Shabby chic is cozy, but overcrowding the space with too many decorative elements can make it look messy rather than elegant.
- Ignoring Color Balance: A mix of pastels and neutrals is ideal, but using too many mismatched tones can make the space feel chaotic rather than harmonious.
Another mistake is neglecting functionality. While vintage pieces are beautiful, they should also be practical and comfortable for everyday use. Choose decor that enhances both aesthetics and usability.
Budget-Friendly Tips For Achieving A Beautiful Shabby Chic Decor Style
Shabby chic decor doesn’t have to be expensive. With smart shopping and creative DIY projects, you can achieve a charming vintage look without overspending.
Thrift stores and flea markets are great places to find affordable shabby chic furniture and decor. Look for wooden tables, chairs, or dressers that can be repainted or distressed to match the aesthetic. Second-hand mirrors and frames can also be transformed with a coat of white or pastel paint.
- Repurpose Old Items: Turn old fabrics into pillow covers or curtains. Use vintage teacups as plant holders or candle holders.
- DIY Chalk Paint: Instead of buying expensive furniture, make your own chalk paint with plaster of Paris and acrylic paint for a budget-friendly distressed look.
Shopping smart and embracing DIY projects can help you create a stunning shabby chic space without breaking the bank.
Where To Shop For Authentic Shabby Chic Decor Pieces
Finding authentic shabby chic decor pieces requires knowing where to look. From local thrift shops to online marketplaces, many options can help you achieve the perfect vintage-inspired home.
Flea markets and antique stores are excellent for discovering unique, one-of-a-kind furniture and decor. Look for distressed wood furniture, vintage mirrors, and floral ceramics that match the shabby chic style. These places often offer affordable deals compared to brand-new items.
For convenient shopping, online platforms such as Etsy, eBay, and Facebook Marketplace have a wide selection of shabby chic decor. Many independent sellers offer handmade or upcycled pieces that perfectly fit the aesthetic.
Home decor stores also carry shabby chic-inspired collections. Retailers like HomeGoods, Wayfair, and IKEA often have furniture and accessories with soft pastel hues, floral prints, and distressed finishes, making it easy to incorporate this style into your home.
Heavy Equipment Overhaul Checklist

Apex Traffic vs ClickSEO: How to Use Both for Instant and Long-Term Website Success

Augie Martinez Lehigh: Transforming Student-Athletes with Leadership and Sports Excellence

Helonia Neue: How This Font Enhances Readability Across Web, Branding, and Editorials

PR-AD-48-760-35ZMHY: A Smart, Cost-Effective Solution for Automated Product Movement

Start Post GravityInternet.net: A Complete Walkthrough from Signup to Publishing Your First Post

Crypto30x.com Zeus: The Ultimate AI-Powered Trading Bot for Smarter Cryptocurrency Investments

Belichick Prescott Cowboys Turnaround: The Game-Changing Impact on Dallas

Luther Social Media Maven Keezy.co: The Ultimate Growth Strategy for Brands

DieHard Boat Motor 48858615: Complete Guide to Features and Maintenance
Heavy Equipment Overhaul Checklist
Apex Traffic vs ClickSEO: How to Use Both for Instant and Long-Term Website Success
Augie Martinez Lehigh: Transforming Student-Athletes with Leadership and Sports Excellence
Helonia Neue: How This Font Enhances Readability Across Web, Branding, and Editorials
PR-AD-48-760-35ZMHY: A Smart, Cost-Effective Solution for Automated Product Movement
Start Post GravityInternet.net: A Complete Walkthrough from Signup to Publishing Your First Post
Crypto30x.com Zeus: The Ultimate AI-Powered Trading Bot for Smarter Cryptocurrency Investments
Belichick Prescott Cowboys Turnaround: The Game-Changing Impact on Dallas
Luther Social Media Maven Keezy.co: The Ultimate Growth Strategy for Brands
DieHard Boat Motor 48858615: Complete Guide to Features and Maintenance
-
 L,IFESTYLE2 years ago
Exploring the Heart of Iowa City Downtown District
-
 TECH2 years ago
Maximizing Your Pixel 6a’s Wireless Charging Performance: Tips and Tricks
-
 SPORTS3 years ago
club america vs deportivo toluca f.c. timeline
-
CRYPTO2 years ago
Features of Liquidity Providers and Differences Between Them
-
 BUSINESS2 years ago
The Evolution of the Patagonia Logo: A Look at the Brand’s Iconic Emblem
-
 TECH3 years ago
Build Your Email Marketing Contact
-
 TECH3 years ago
6 Ways AI Will Change the Future of Marketing
-

 HEALTH8 months ago
Prostavive Colibrim: A Natural Prostate Health Supplement